


Meaning of the tilde character in the contact list
The tilde character (~) in front of a contact name indicates that the name displayed is a nickname (e.g. “~Bob”). A user can choose any nickname, and it might not correspond to the actual name of said user (e.g. “Robert Smith”).
In the following cases, the tilde is not displayed:
- You define the first and last name of users using your administrator privileges (via configuration settings or in the contact list that you provide through the management cockpit).
- Contact synchronization is enabled, and the ID matches an email address and/or telephone number of a contact stored in the local address book. In this case, the contact list will show the name stored in the local address book instead of the nickname.
- The user entered the name manually in the contact details in the app. In this case, the contact’s name is displayed, not the nickname.
Related articles
Using Threema Work’s management cockpit, you can easily manage your subscriptions and users.
As an administrator with a “Professional” subscription, the management cockpit allows you to:
- Create quotations and access orders and invoices
- Increase the number of users and renew subscriptions
- Upgrade existing subscriptions and purchase new ones
- Manage the app’s contact list
- Send automated messages to the entire organization with Threema Broadcast
- Configure the app for all or individual users
- Manage users’ app access
- Manage users’ Threema IDs
- Set an in-app logo
- View app usage statistics
- Request technical support
In addition, “Professional” customers can manage users and subscriptions via API.
Purchase additional licenses for external or temporary employees joining your team. You can integrate them in an existing subscription or keep them in a separate subscription.
Assigning these users a tag, e.g. “temporary”, helps you to keep track of these licenses.
Once the project is finished, you can withdraw their access to the Threema Work app and/or prevent the use of their Threema ID, thereby excluding them permanently from internal communication. Learn more
With the following configuration settings, users of a subscription can only communicate with other users of the same subscription or with contacts that were added in the management cockpit. The communication with external contacts is inhibited.
| Tab | Configuration Setting | Activated | Value |
|---|---|---|---|
| Contacts | th_block_unknown |
On |
true |
| Contacts | th_contact_sync |
On |
false |
| Contacts | th_disable_add_contact |
On |
true |
| Profile | th_readonly_profile |
On |
true |
Hint: If you use Threema Broadcast, you can use this communication principle also for your Broadcast ID (“Availablility: Internal only”).
When deleting users, questions appear that help you to take the right steps, especially when handling staff changes:
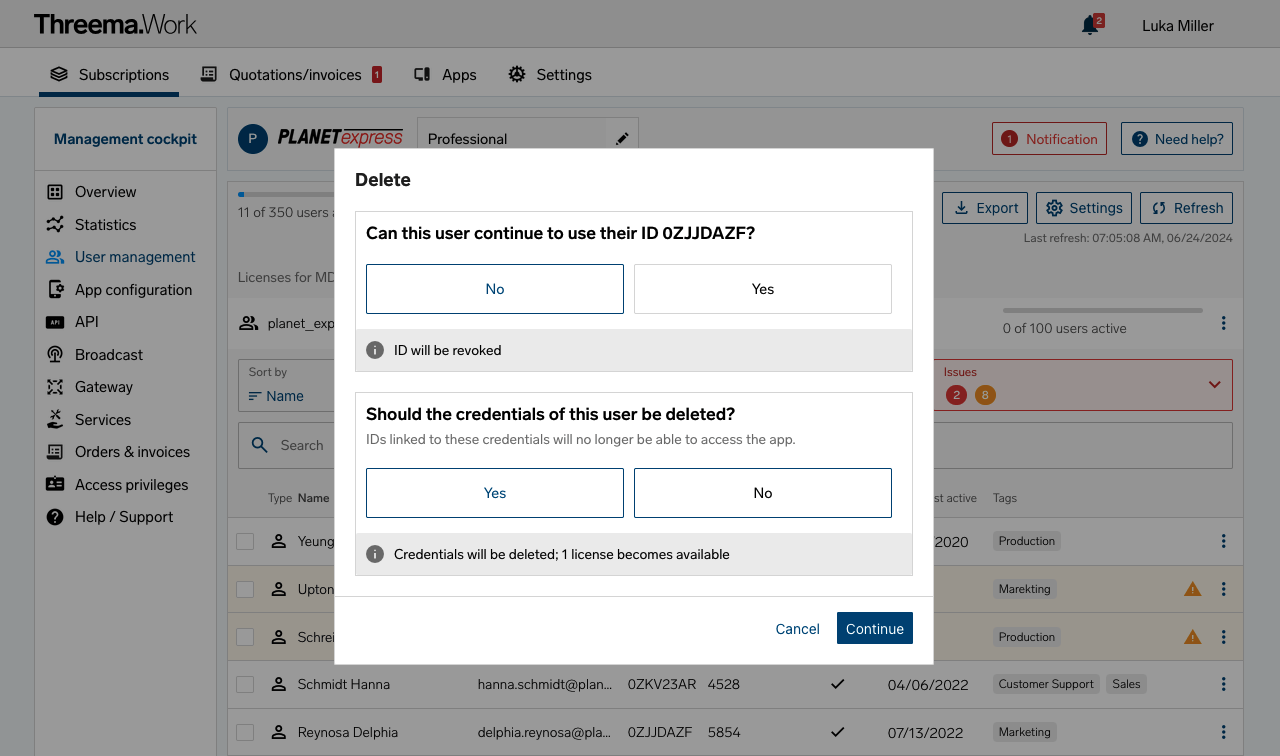
“Can this user continue to use their ID?”
Answer “No” if the employee is leaving the company or is no longer allowed to send or receive messages with their Threema ID. This is also useful if a user has accidentally created multiple IDs. (This answer corresponds to the former option “Revoke ID.”)
Please note:
- Revoking an ID cannot be undone.
- As a Threema Work administrator, you can revoke a user’s Threema ID even if they have set an ID revocation password.
- It might take up to one hour for a revocation to take effect. After a Threema ID has been revoked, it will be displayed striked-through in contact lists of other users within 24 hours. If the option “hide inactive contacts” is enabled, the ID disappears entirely.
If you answer “Yes”, a follow-up question will appear in which you can specifiy where the user may continue to use their ID. If the ID is used again in conjunction with a license of this subscription, it will remain in the contact list of active users.
“Is the user allowed to continue opening/using the app?”
Answer “No” if the user has lost their device, for example, or if you want to make sure that they can no longer access any chats or make calls. (This answer corresponds to the former option “Delete credentials.”)
To integrate Threema Work into your central directory service (such as MS Exchange, AD, or LDAP), please use our APIs:
Different ways of integrating Threema Work into your central directory service are illustrated below.
In-app contact list
The Threema Work app can optionally synchronize its contact list with the address book of the mobile device. If the address book is linked to your central directory service (e.g., MS Exchange, AD, or LDAP), the contacts are mapped automatically to the appropriate Threema IDs, and contacts who use Threema appear in the app’s contact list. Learn here how to label internal contacts.
If you disable contact synchronization on the mobile devices, you can still add contacts via the management cockpit. The Threema Work API allows to automate the process of adding contacts to the management cockpit.
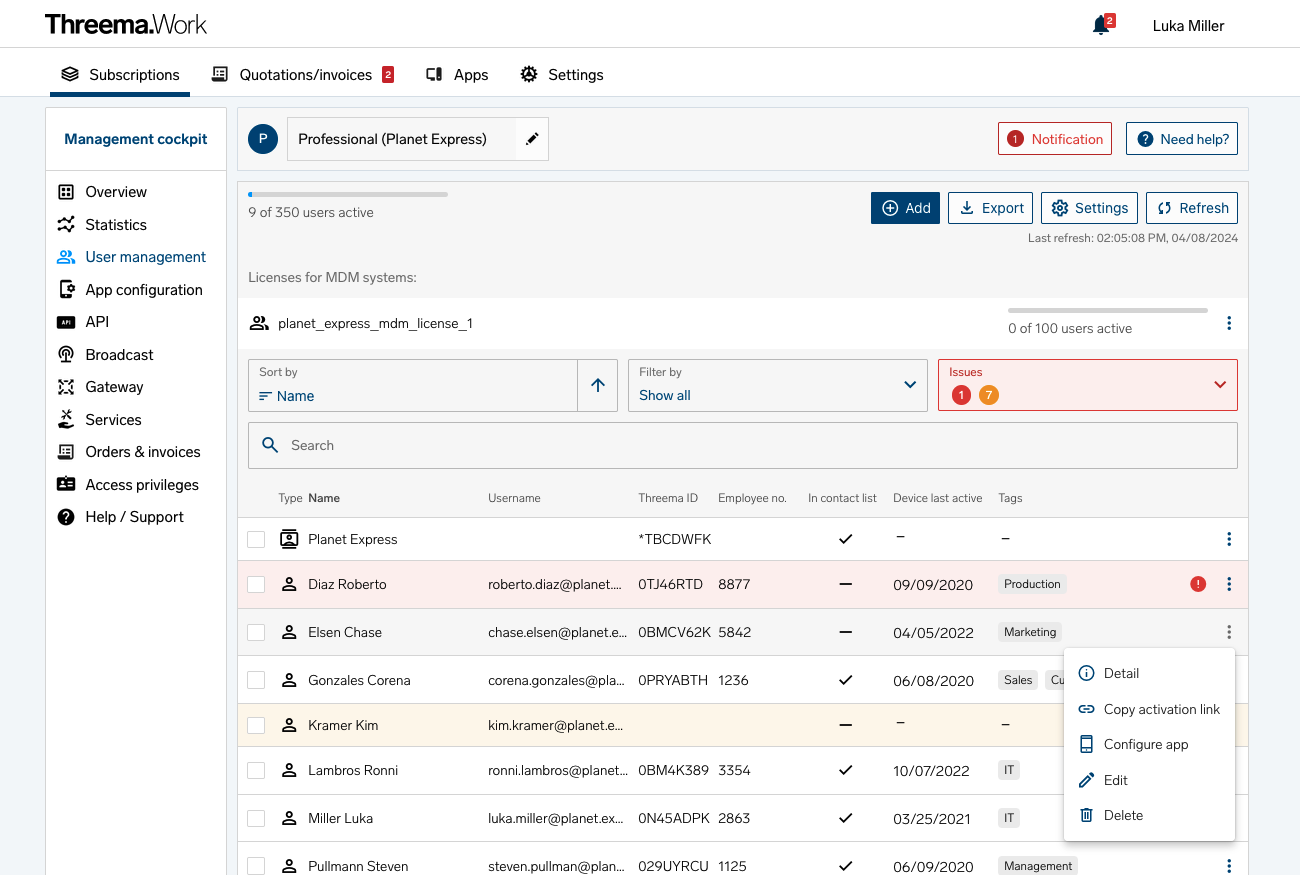
User management
Using the Threema Work API, you can automate administration and user management. Any management task that can be completed using the management cockpit can be completed using the API, for example:
- Add, edit, and delete users
- Manage the app’s contact list
- Configure the app (e.g., prevent video calls or block unkown contacts)
Broadcast: Groups, feeds, and distribution lists
Threema Broadcast is the perfect tool for efficient top-down communication. Using the Broadcast API, you can dispatch messages and manage feeds, distribution lists, and groups. Integrating Threema Broadcast into your directory service (e.g., MS Exchange, AD, or LDAP) is quite easy.
Threema Work users’ contact lists can be managed as follows:
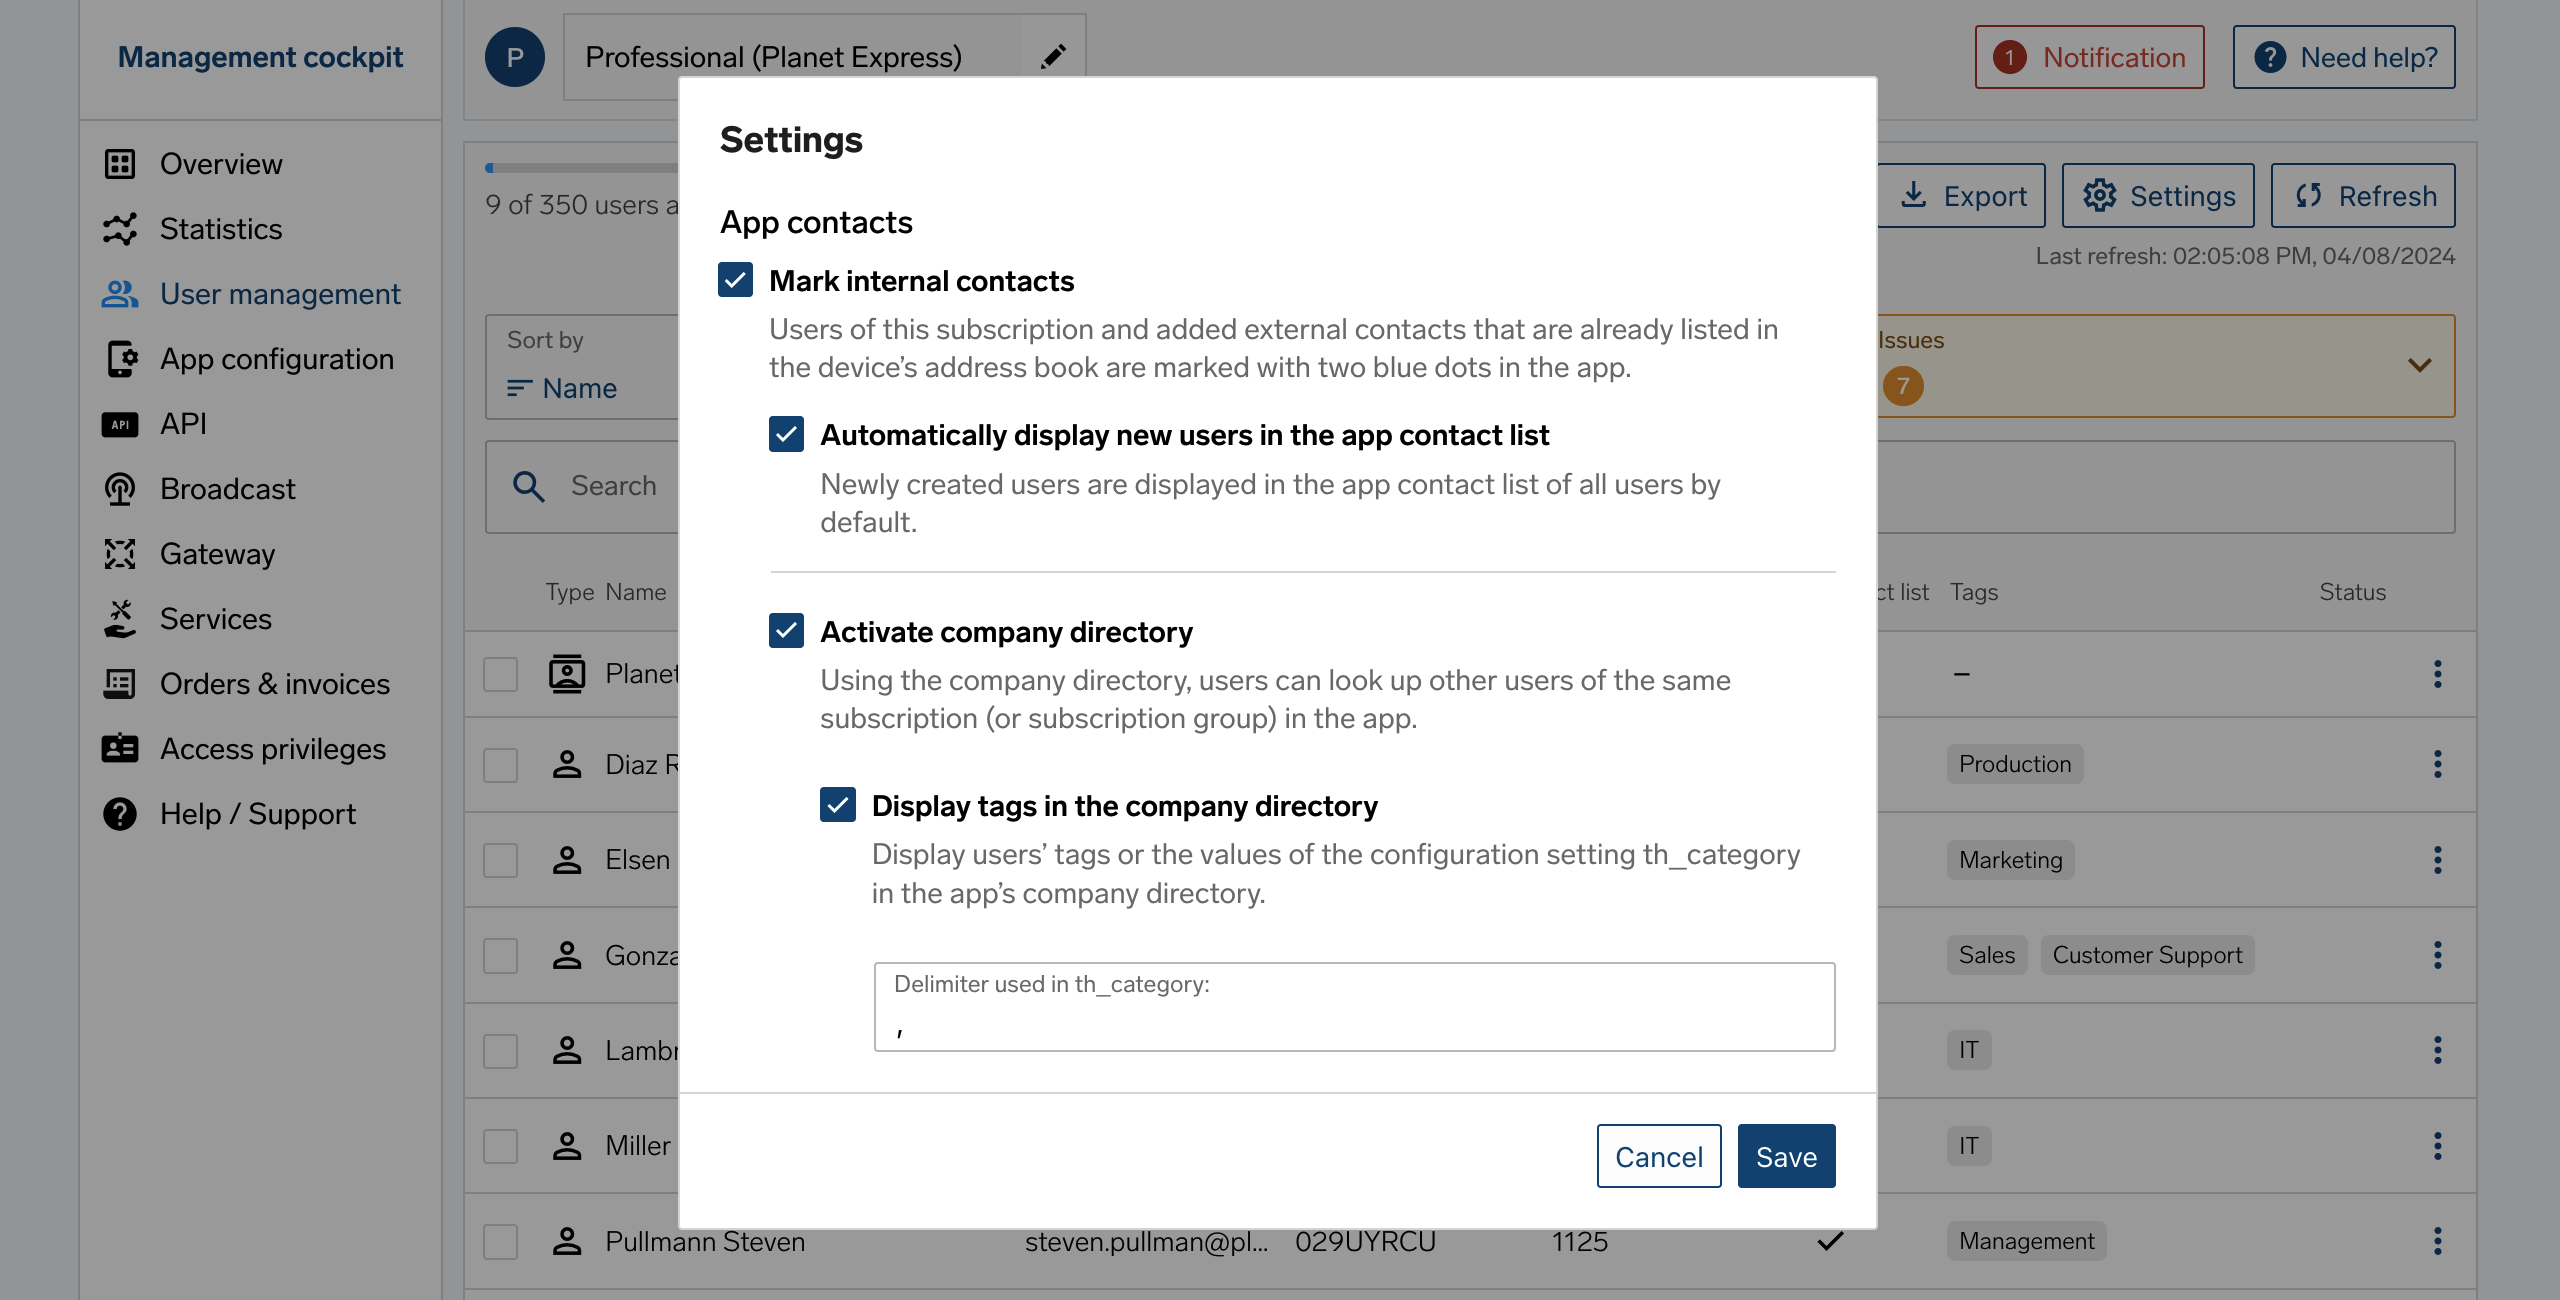
Mark internal contacts
The colored dots next to a contact indicate the verification level. Users of the same subscription and added external contacts can be marked with the blue verification level. Navigate to “User management > Settings > Mark internal contacts” to (de)activate the blue verification level.
Automatically display new users in the app contact list
Newly added users can be displayed by default in the app contact list of all users by checking the box under “User management > Settings > Automatically display new users in the app contact list.”
For users and contacts, you can see whether they are part of the app contact list by checking the “In contact list” column. You can find this information in the overview of the user management and in the detail view of a user or contact in the “User details” section. Once added, you can no longer remove an external contact from the app contact list.
Corporate directory
For large organizations comprising of several hundred or even thousands of members, making all contacts available (s. above) inevitably leads to an overwhelmingly long contact list. Here’s where the “corporate directory” comes into play. It allows users to quickly look up other members of the same organization or subscription group right in the app. Add to that the ability to query all members of a given department using tags (and the wildcard search).
Setting up the “company directory” is simple and straightforward; please refer to the dedicated step-by-step guide for details.
Good to know: If the company directory is active but should not be available in the app to certain users, set the “th_disable_work_directory” configuration setting in the app configuration to “On” and “true” for these users. This way, they won’t be able to access the company directory.
Restrict communication to internal contacts (Closed user group)
Using the following configuration settings, users of a subscription can only communicate with other users of the same subscription or with contacts that were added manually in the management cockpit (see “Make contacts available” above). The communication with external contacts is disabled.
| Tab | Configuration setting | Activated | Value |
|---|---|---|---|
| Contacts | th_block_unknown |
On |
true |
| Contacts | th_contact_sync |
On |
false |
| Contacts | th_disable_add_contact |
On |
true |
| Profile | th_readonly_profile |
On |
true |
The “subscription group” feature allows you to share the company directory across several subscriptions and thus search contacts in all of the subscriptions that belong to the same group. To use the feature, at least two subscriptions of the Professional and/or Education price plan have to be grouped, and the company directory needs to be activated.
If you want to allow your users to search contacts across several subscriptions , please proceed as follows:
- Log into your Threema Work admin account.
- Activate the company directory in the subscriptions you want to group: navigate to “User management > Settings” and check the box next to “Activate company directory.”
- In the “Subscriptions” overview, tap on the “Create new subscription group” button.
- Define a name for your subscription group.
- Drag and drop the required subscriptions into the subscription group.
If the company directory should not be available in the app for certain users, adjust the corresponding configuration setting in the app configuration in the management cockpit as described here under “Company directory.”
Good to know: contacts that have been found and added to the local address book via the company directory are labeled with two blue dots as an internal contact.
Get an overview of the configuration settings available in the management cockpit in our product demo.
Example: Allowing the creation of group chats only for individual users
If you aren’t using an external MDM system or would like to preconfigure the app for users who bring their own devices (BYOD), we recommend using the app configuration in the management cockpit.
Adjustment for all users (Global)
- Open the “App configuration” section in the Threema Work management cockpit, which expands the subsection “Global”.
- In addition to the name of each configuration setting, the table contains a short description of the impact a configuration setting change has in the app.
- In our example, navigate to the category “Communication,” activate th_disable_create_group, and change the configuration setting to
true.
Adjustments for individual users (Individual)
- Open the “Individual” subsection, and click on a username to select one or more users who may use the app differently than what the global settings define.
- Clicking on “Continue” (the number of selected users is shown in brackets) allows you to adjust the app further in the respective category.
- Activate the configuration setting in the category “Communication,” and leave it
false.
You have now successfully configured the app in a way that allows only predefined users to create a group chat.
Efficient input of individual values
If your subscription contains more than a dozen users, having to manually edit each value can be cumbersome, and it might be a good idea to import the values using a CSV file. In the management cockpit, navigate to “App configuration,” select “Import/export”, and proceed as follows:
- Export the configuration settings as a CSV file
- Edit the configuration settings in the CSV file
- Import the edited CSV file
The individual settings are now defined.
To automate the process, you can use the Threema Work API.
Good to know
- Individual configuration settings for individual users are treated with a higher priority than global configuration settings for all users, i.e., individual configuraton settings override global configuration settings.
- All configuration settings concerning app customization are documented both in the management cockpit and in the Threema Work website’s help section.
- A few configuration settings (those with an information icon next to the configuration setting name) are only set when users license the app. For users who have completed the setup process, a change to these settings will only become effective if they reinstall the app or generate a new ID.
Contact list in the app
It can take up to 24 hours until new users are visible or contact changes become effective in the app’s contact list. However, the synchronization can be forced manually in the app by pulling down the contact list.
Contact list in the management cockpit
The management cockpit and Threema’s directory server sync once per hour. Therefore, it can take up to one hour until new users are visible in the management cockpit’s “Contacts”.
Threema Safe allows to automatically create backups of your users’ most important Threema data and settings on a regular basis. By means of configuration settings in the category "Backups", you can determine whether your users can (A), cannot (B), or must (C) use Threema Safe. By default, Threema Safe can be used.
(A) Threema Safe can be used
Generally, you don’t need to adjust any configuration settings if you want to allow your users to choose whether to use Threema Safe or not. Please note, however:
-
If you have set
th_disable_backupsis totrue, you need to set this configuration setting tofalsein order to allow your users to use Threema Safe. -
If you have already set
th_safe_enabletotrueorfalse, you need to delete this configuration setting in order to allow your users to use Threema Safe. Ifth_safe_enableis set, it is either mandatory (true) or impossible (false) to use Threema Safe.
Use th_safe_server_url to specify the server on which Threema Safe backups are stored. If th_safe_server_url isn’t set, your users can store Threema Safe backups on the Threema server or on any other server. Learn how to set up your server for Threema Safe…
(B) Threema Safe cannot be used
Set th_safe_enable to false to prevent your users from using Threema Safe. If you have already set th_disable_backups to true, it’s not necessary to set the th_safe_enable parameter. If th_disable_backups is set to true, no backups can be created.
(C) Threema Safe must be used
First, make sure that th_disable_backups and th_skip_wizard are not set to true. Then, set th_safe_enable to true. This configuration enforces the use of Threema Safe.
If you want to store your users’ Threema Safe backups on your own server, specify the URL to the Threema Safe directory on your server in th_safe_server_url. If this configuration setting isn’t set, your users’ Threema Safe backups will be stored on the Threema server. If your server requires authentication, please specify username and password in th_safe_server_username and th_safe_server_password, respectively.
Automatically restore Threema ID: This requires an external MDM system and is not available in the app configuration in your management cockpit. If you set th_safe_password and th_safe_restore_id, the backup will be restored without user interaction. Users don’t need to enter a password when re-installing the app or switching to a new device and can continue to use Threema Work immediately.
Company logo
Increase your employees’ identification with the app by placing your company logo in the app’s header.
Internal support form
Define how your users get first-level support by integrating an URL for your internal support into the app.
As a subscription’s administrator, you can add additional administrators and define the scope of their access privileges.
In the management cockpit, navigate to “Access privileges”. First, click on “Add user” to add a user. Then, set the user’s access privileges by ticking the appropriate checkboxes.
Additionally protect access to your management cockpit with two-factor authentication using Threema or another service of your choice.
- Log in at https://work.threema.ch/en/login.
- In the menu, select “Profile”, and click on “Login and security”.
- Follow the instructions.
- Store the backup codes you obtain after completing the setup. Using these codes, you are able to sign in if you should ever lose your mobile device.
Firewall settings can prevent the Threema Work app from establishing a connection to the Threema server, or they might block access to the management cockpit. To resolve this issue, please open the appropriate TCP ports.
Threema Work app: TCP ports 443 and 5222 need to be open for outgoing connections. Messages are transmitted through port 5222; port 443 serves as fallback in case of delays. For directory queries (synchronization of contacts, etc.) and media transmissions, HTTPS port 443 is used.
Threema calls: UDP port 3478 needs to be open for outgoing connections.
Threema group calls: UDP ports 22500–22532 need to be open for outgoing connections.
Management cockpit: TCP port 443 needs to be open for outgoing HTTPS connections.
If you experience connectivity issues with the desktop app or the web client, please refer to this FAQ article.
Threema Work offers several backup options that differ in various respects:
| ID export | Data backup | System backup | Threema Safe | |
|---|---|---|---|---|
| Configuration Setting | th_disable_id_export | th_disable_data_backups | th_disable_system_backups | Documentation |
| OS | Android, iOS | Android | iOS | Android, iOS |
| Threema ID | ||||
| Chats, including media files | ||||
| Contacts, group memberships, and app settings | ||||
| Can be managed by admins | With external MDM system | With external MDM system | ||
| Can be created by users | ||||
| Storage location | File or email | File | iTunes or iCloud | Threema / Custom server |
| Storage duration | Custom | Custom | Custom | 180 days / Custom |
By default, all backup options are available. Use configuration settings to restrict some or completely disable all backup options:
Don’t allow any kind of backup
To prevent your users from creating any kind of backup, use th_disable_backups. (This configuration setting overrides all configuration settings listed below.)
Prevent ID exports
To prevent your users from exporting their Threema ID, set the parameter th_disable_id_export totrue.
Prevent data backups (Android)
In Threema Work for Android, users can create data backups. To prevent this, set the configuration setting th_disable_data_backups, to true.
Prevent inclusion in OS backups (iOS)
iTunes backups can include Threema data. Set th_disable_data_backups to true to exclude Threema data from OS backups. Due to a restriction on iOS’ part, it’s not possible to distinguish between iTunes and iCloud backups.
Threema Safe
Set the configuration setting th_safe_enable to false to prevent users from creating Threema Safe backups. To learn more about the configuration of Threema Safe using configuration settings, please refer to this Help article.
You can use configuration settings to define which backup options are (not) available to your users. By default, all backup options are available.
Do not allow any backups at all
To prevent your users from creating any kind of backup, use
th_disable_backups
. (This configuration settings overrides all settings listed below.)
Prevent ID export
To prevent your users from exporting their Threema ID, set the configuration setting
th_disable_id_export
to true.
Prevent data backups (Android)
In Threema Work for Android, users can create data backups. To prevent this, set the configuration setting
th_disable_data_backups
to true.
Prevent inclusion in OS backups (iOS)
iCloud/iTunes backups can include Threema data. Set
th_disable_system_backups
to true to exclude Threema data from OS backups.
Threema Safe
Set the configuration setting
th_safe_enable
to false to prevent users from creating Threema Safe backups. To learn more about the configuration of Threema Safe using configuration settings, please refer to this Help article.
User management in management cockpit
The following browsers are supported (on any operating system): Mozilla Firefox, Google Chrome, Chromium, Opera, and Safari. No other browsers are supported.
App use on mobile device (smartphone or tablet)
| Minimum requirement OS | Minimum requirement Threema Work app |
| iOS 10 and iPhone 5s or above | 3.01k |
| Android 4.4 | 4.3k |
Other operating systems are not supported.